
Famicom Data Recorder - A Guide To Finally Saving Your Excitebike Tracks

Entry posted by Jono1874
1,627 views

The Following is a guide on how to use a tape deck with your NES to save data on Wrecking Crew, Excitebike, and Mach Rider. These games originally used what was know in Japan as the Famicom Data Recorder to permanently save custom tracks, scores, and levels. Unfortunately, a peripheral that allowed such functionality for the NES was never released. This is despite the fact that the functionality remains programmed within the cartridges. For over 30 years, NES users have had to live with the unfortunate fact that they were never, EVER, allowed to save their Excitebike tracks. Until now. It is 100% possible to get this up and running on your NES . You're going to need a few things though. Most are pictured above and listed below.
1) any mono cassette recorder with MIC 3.5mm line in and EAR/AUX 3.5mm line out. Preferably battery powered. See image below if you're unsure.
2) two 3.5mm AUX cables. you can buy these pretty much anywhere
3) Cassette tapes
4) Compatible software, (See image above)
5) a Famicom keyboard
6) an ENIO Expansion board
*OPTIONAL BUT RECOMMENDED*
a DB-15 Extension Cable - Get one here
Finding Blank Cassette Tapes
There are still tons of blank cassette tapes on eBay. The prices are pretty reasonable. Generally, you want to get the shortest tapes you can possible find. Why? My main tape I use right now is a 30 minute each side tape with Mach Rider on one side and Wrecking Crew on the other. The problem is, if I want to play Wrecking Crew immediately after playing Mach Rider, I need to flip the tape and then wait while the tape rewinds to the very beginning. If you use a tapes that are short in length, you don't have to wait as long. you don't want to save more than one game file on a single side of a tape, because it could be hard to find. If you buy a Tape Player with a counter, than I suppose just do whatever you want.
Good cassette tape brands include Sony, Maxell, and Fuji. Get those to ensure the best possible audio quality and reliability.
Your Cassette Deck and You


As I mentioned, it needs to have two separate lines. one for input (MIC), one for output(EAR). Most cassette recorders have these, but some will have a 2.5mm Microphone port. You can use an adapter, but you might as well just buy one with a 3.5mm MIC. Do NOT use any sort of cassette deck you might find at Wal-Mart or Target. These are absolute garbage and will be eating your tapes before you know it. You should get something that was made when cassette tapes were contemporary. They're usually far better quality. I personally use a Realistic CTR-66. It has all the necessary ports, is reliable, and has great battery life. You're definitely going to want to use batteries. You could plug your tape deck in, but it wastes a wall socket and limits where you can use it.
When you get you tape deck, be sure to test everything. most tape decks in this style tend to have built in mics, so try recording your voice onto a tape and see how well it comes out. Run a tape through it for 30 minutes, Record a song off your phone. Whatever it takes to make sure the recording is clear as it can be Also, you'll want to know for sure that you're not going to end up with an eaten up tape while you're trying to save your Mach Rider score. If it's going to eat your tape, it'll do it during this test.
The Famicom Keyboard 
You're going to need to get your hands on a Family Basic Keyboard as well. This insane accessory has two 3.5mm jacks on it that we're going to use to hook our NES up to our tape deck. Thats right, this massive monster is basically a passthrough. This is by far the easiest and cheapest way to do this kind of thing. There are other methods that I'll discuss in the future, but right now, this is what I've got to give you. The keyboard is relatively cheap though so no worries there. It hooks up to a port that is only found on the Famicom, however. We're going to need one more thing.
ENIO EXP Board

Okay, so here's a huge hurdle. As of this writing, these aren't being made anymore. The ENIO EXP Board (To be referred to as ENIO from here on out) allows for users to gain access to the expansion port at the bottom of the NES. It generally comes with a Famicom Expansion Port adapter, which we can use to hook up the keyboard and in turn, the Data Recorder with your NES. The ENIO is not wired to work with the Data Recorder out of the box, so you'll need to modify it in order for this whole setup to work. By soldering a jumper wire from the left via on R2 to pin 2 of J5, you'll be able to use the ENIO in conjunction with the keyboard to save data with the Data Recorder. Some ENIOs have a resistor occupying that area. Remove it as shown. Newer ones didn't even come with this resistor to begin with, so it's no loss.

Hooking it all up and Playing

Now that you have gathered all the stuff needed to get this working, you're going to need to set it up. If you're using an NES, plug your newly modified ENIO into the bottom of you NES.
1) plug the ENIOi nto the port at the bottom of your NES with the Famicom Expansion Port Adapter attached
2) plug the keyboard into the NES
3) With an 3.5mm AUX Cable, plug READ on the Keyboard into EAR on your tape deck
4) With the other 3.5mm AUX Cable, Plug SAVE on the Keyboard into MIC on your tape deck
5) Of course, don't forget to put a blank tape into the tape deck.
Your setup will look like this photo when everything is completed. Try to hide the wires the best you can. If you sit far away from the TV, the extension cable I linked at the begining of the article has you covered. That way, your NES can stay in it's spot, and you can save and load with the tape drive as needed without getting up from the comfort of your chair.
Calibration and Testing
Now that you've got everything set up and ready to go, you're going to want to make sure your volume wheel is turned up as high as it can possibly go. This is important. If the NES cannot hear your tape deck, it wont be able to load any data. First thing you're going to want to do is create a test track or level in the game of your choice. I recommend Excitebike. Lay down a track piece or two, set the end of the stage, and test the stage. Once you've completed the stage at least once, navigate to the menu option marked "SAVE", press record on your tape player, wait a few moments, and the hit start on the controller. The screen will then indicate that it's saving. When your thrown back into the menu, press stop on the tape, rewind the tape, and turn off the NES. Turn the NES back on, go back to the "DESIGN" menu, navigate to the "LOAD" area and press start. Once the game indicates that it's trying to load, press play on the tape.
Wait a few moments. If the NES detects the tape data, N101 will appear on the screen below the word "LOADING". Once it's fully loaded, you'll hear a beep.
If the Data Recorder isn't being detected, adjust the volume slightly lower, Rewind the tape, and try again. The NES will continuously look for tape data while the LOADING screen is active, so there is no need to reset the console if it doesn't detect the data.

REMEMBER THE BASIC PROCEDURE!
For Saving, always press record before activating the in game save function
For Loading, Press Play after activating the load function.
This applies to every data recorder for every machine that ever used one.
And that's basically it. I've been using this setup for about a year now and even though it's nothing more than a novelty, I don't like the idea of not having it attached to my NES. I play Mach Rider a lot more than I ever have before thanks to this feature. The fact that I can save my scores and come back later to try to beat them makes the game that much more addictive.
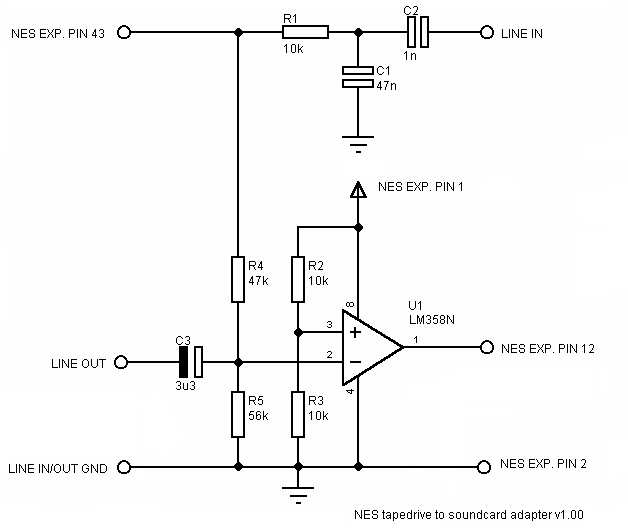
There are definitely better ways to do something like this. Wrecking Crew and Excitebike got better versions on the Famicom Disk System, and both allowed for saving directly to disk. Hell, the Everdrive and it's save state function basically enables this function in all the games that support it as well. This to me is more of a proof of concept than anything else. I didn't personally discover any of the stuff here, but I sure do find it fascinating and since there was no other documentation that this is even a thing, I figured why not make a guide so others could do it too. As I mentioned before, I'm looking for better methods to accomplish this. There's a circuit on NESdev that you can build that supposedly gets you the same functionality without any of this extra nonsense, but I can't get it to work. The input and output are too quiet. Oh well.
-
 3
3
-
 1
1
-
 1
1


3 Comments
Recommended Comments
Create an account or sign in to comment
You need to be a member in order to leave a comment
Create an account
Sign up for a new account in our community. It's easy!
Register a new accountSign in
Already have an account? Sign in here.
Sign In Now